Thursday, December 29, 2011

Flourless pistachio cupcakes with rosewater icing

It's probably because I have time on my hands, but I've been in the middle of some kind of reorganisation craze since I started annual leave. I've been madly moving the contents of all the kitchen cupboards and shelves around, finding things I forgot I had. Just before Christmas I turned the shelving over the buffet unit into a book case which means I now have room in my book cases for the other accumulated books that have been sitting stacked on the side table!


I've also been clearing out the pantry looking for anything that needed to be used up. I found a bag of pistachios to use and went searching the net for a pistachio cupcake recipe. All the recipes I found called for flour, and a lot of them were just vanilla cupcakes with pistachios stuck on top of the icing. I had already used the last of the flour I had making fruit cakes for Christmas so I improvised an almond meal recipe.

Ingredients (makes 12 large cupcakes)

Cupcakes:
  • 1 cup whole unsalted pistachios
  • 1 1/4 cups sugar
  • 1 teaspoon salt
  • 4 ounces (1 stick) unsalted butter, softened
  • 2 teaspoons pure vanilla extract
  • 1 tablespoon rosewater
  • 4 large eggs
  • 1 1/2 cups almond meal

Icing:
  • 125g butter or nuttalex, softened
  • 1 1/2 cups pure icing sugar, sifted
  • 2 tsp rosewater
  • Pink food colouring (optional)

Decoration:
  • 1/4 cup crushed pistachios for decorating

Directions

Cupcakes:
  1. Preheat oven to 190 degrees. 
  2. Using a food processor or blender, process the pistachios in small batches till finely ground.
  3. Combine the pistachios, almond meal, sugar, and salt in a food processor until finely ground. 
  4. Mix in butter, vanilla, rosewater, and eggs, until smooth. 
  5. Divide batter among cupcake liners.Bake about 30 minutes or till a knife poked into the centre of a cake comes out clean. 
  6. Leave cakes in the tin to cool.


Icing:
  1. Beat butter in a large mixer till smooth and and slightly lighter in colour.
  2. Mix in the icing sugar, 1/2 a cup at a time.
  3. Add in rosewater and food colouring and mix till smooth.


Decoration:
  1. Ice each cupcake and decorate each with a sprinkle of crushed pistachio.


The cakes were nice and moist and for an improvised recipe at 1 in the morning they turned out quite well. While tall swirls of icing always looks nicer on cupcakes, I personally think it would be too sweet to do with this cupcake.

Apologies for the camera phone photos. My camera died a while back and I haven't decided what I'm getting as a replacement yet.

Wednesday, December 28, 2011

Christmas pudding vodka and eggless eggnog

Wow, it's been a really long time since my last post! It's been an insanely busy year at work, coupled with wedding planning, unwell dogs and the general family rollercoaster having more extreme ups and downs than usual. It's nice to finally have some free time again. For a couple of weeks at least... While I am enjoying my much awaited annual leave, I'll try to put up a few posts with some recipes I've had sitting waiting till I had the time available to make them (between playing Skyrim which is awesome!).

Today's recipes should really have gone up before Christmas, but better late than never...

In Sweden it is common to have a small drink of spirit at Christmas time, usually vodka or akvavit. This year I had a go at making my own flavoured vodka for skål.

This recipe is modified from The Hairy Biker's 12 Days of Christmas, and it tastes brilliant! The original recipe called for 75grams of caster sugar which I omitted because I thought it would make the vodka too syrupy sweet. I'm glad I did because all that fruit made the vodka sweet enough as it was. I also dropped the nutmeg from the recipe because one of our guests has a nutmeg allergy.

Christmas pudding vodka


Ingredients

  • 300g mixed dried fruit (my mix had citrus peel, sultanas, raisins and currants)
  • 3 cinnamon sticks
  • 2 teaspoons of ground mixed spice *
  • 6 cloves
  • Finely grated zest of 1 orange
  • Finely grated zest of 1 lemon
  • 750ml bottle decent quality vodka


Method

  1. Mix in a large jug or other container.
  2. Cover tightly with a lid or clingwrap.
  3. Leave the mix in the fridge for 3 days, stirring once or twice daily.
  4. Strain the liquid into a jug through a fine seive lined with muslin. ** 
  5. Pour the liquid into a bottle and keep in the fridge or freezer till ready to serve.

*I used my friends home blended mixed spice that has no nutmeg but contains cinnamon, allspice, cloves and ginger.
**Since I didn't have muslin, I improvised, straining it through a coffee plunger which did the job.

The result was a beautifully deep amber coloured vodka that did actually taste like a Christmas pudding. 

Served in a whiskey glass since I couldn't find my shot glasses... 

Since the dried fruit soaked up a decent amount of vodka you don't get back a full bottle. The leftover vodka fruit is great for making fruit cakes or having with icecream. 


I also made a batch of eggless eggnog.

Eggless eggnog

Ingredients
  • 1 pack silken tofu. The pack I used was 300grams.
  • 4 cups milk. I used soy. 
  • 1 cup caster sugar
  • 2 teaspoons vanilla essence.
  • 1/4 teaspoon ground cinnamon.
  • 1/4 teaspoon mixed spice.
  • 3/4 cup of brandy.
  • 1/2 cup of dark rum.
Method
  1. Put everything in a blender and blend till smooth.
  2. Leave the nog in the fridge to chill.
  3. Serve over ice with a dusting of spice over the top.  
Unfortunately by the time I remembered I needed a photo, all the nog had vanished... 

Hope you all had a wonderful Christmas. With all the pudding vodka and eggnog I know I did. 

Sunday, February 27, 2011

30 Day Vegan Easy Challenge - recipe list and questions for vegans

I signed up to do the 30 Day Vegan Easy Challenge, running from 1st to 30th March. Unfortunately I will be doing the challenge alone - the rest of my household will be trying to be supportive and eat vegan meals with me when I cook at home. Initially we had all agreed to do the challenge together, but they backed down. Ah well.
I've been going through some of my recipe books, marking out recipes I'd like to try over the 30 days. I'm going to try to be a lot more organised about my cooking during March than I usually am. Inspired by The cookbook challenge post over at Gourmet Green Giraffe, I thought it would be a good idea to start a list of recipes I like the sound of so I can refer back or add to it over the month.


I'll start with the newest addition to my cookbook collection.


The Vegan Cookie Connoisseur - Kelly Peloza (http://vegancookies.wordpress.com/ and http://seitanbeatsyourmeat.wordpress.com//)

  • Fiesta Margarita Cookies
  • Soy Milk's Favourite Cookies 
  • Apricot Foldovers
  • Iced Caramel Cookies

The Vegan Scoop - Wheeler Del Torro
  • So many things in this book I want to make, but my ice cream maker died and is yet to be replaced...
 Vegan Yum Yum - Lauren Ulm (http://veganyumyum.com/)
  • Stuffed Banana Berry French Toast
  • Sweet Chilli Lime Tofu
  • Seitan Black Bean Corn Burgers
  • Miniature Napoleons with Eggplant Creme
  • Pad See Ew
  • Mini Blueberry Tarts with Lemon Cream

Viva Vegan - Terry Hope Romero (http://veganlatina.com/)
  • Drunken Beans with Seitan Chorizo
  • Seitan Saltado
  • Creamy Potato Peanut Stew
  • Creamy Corn Crusted Tempeh Pot Pie
  • Shredded Seitan and Mushroom Empanadas

How It All Vegan - Tanya Barnard & Sarah Kramer (http://www.govegan.net/)
  • Faux Eggs Benny
  • Sarah's Delicious Chilli
  • Savoury Shepherds Pie
  • Potato "Cheese" Perogies

Vegan With A Vengance - Isa Chandra Moskowitz (http://www.theppk.com/)
  • "Fronch" Toast
  • Asparagus and Sun-Dried Tomato Frittata
  • Lemon Corn Waffles with Blueberry Sauce (OMG, these sound awesome!!!)
  • BBQ Pomegranate Tofu
  • Seitan Portobello Stroganoff
  • Revolutionary Spanish Omelet with Saffron and Roasted Pepper-Almond Sauce
I think the meals at home will be the easiest part of the 30 day challenge. Lunches at work however, I think will be where I will encounter the most hassle. I am not organised enough to make lunches to take to work every day. I work 55-65 hour weeks which really eats into my available food prep time, and I always find that when I think I have made enough dinner to have leftovers for lunch and dinner the next day, someone in the house comes back for seconds or unexpected guests rock up... So at work I usually end up grabbing something in the food court at either QV or Melbourne Central. If I can manage a long enough lunch break I will duck in to either TOFWD or Chan House, but it is rare I will get enough time. And as much as I love the nuggets, I don't think Lord of the Fries for lunch every day is the healthiest idea...

Last week I tried asking a few of the food places at QV if they had vegan options, and got a lot of 'I don't know' responses, and 2 yes - for the veg soups at In a Rush, and for a veg salad with no dressing from the sandwich bar.
So I'm hoping for some advice on what to get for lunches in the city, what are some good options? What are usually safe bets as being vegan suitable? Are breads at sandwich bars usually safe? 

And if you have any of the above cookbooks and can recommend a particular recipe that you love and think I should try, please leave a comment below.

Finally for anyone else doing the 30 day challenge who may have come across my blog, check out this facebook group with a list of 'Ninja Vegan' products. I love that term!

Tuesday, February 15, 2011

Lazy...

I feel like I am really failing at this blog right now. I had all these plans to get back on track and catch up on all the places and dishes that have been exciting me of late but my plans all ended up in the toilet.
Most of my last week was taken up with study when work sent me off on a short course, along with a heavier than usual overtime load. It's been 9 years since I was at Uni (man I feel old saying that) so I am really out of practice. I had forgotten just how much energy intensive classroom learning takes out of you, let alone coming home to study as well. By Friday I was a delirious, sleep deprived mess, though thankfully I passed the certification exam at the end of it all. Actually the exam was a breeze, I kind of felt cheated - all that effort at study for a god damn multiple choice exam!?!?

I spend the weekend in Healesville, so that was a right off too... And so again my blog has been neglected. Then again for the last week, so has cooking... I just simply have not had time for any food preparation that takes more than 5 minutes effort. I still got requests for specific meals, but those requests went pretty much ignored.

The request I half listened to turned out to be one of the best easy meals I have made for a long time. I was asked to make Sloppy Joes. A simple request that I could have acquiesced with a quick trip to the shops. Instead I turned out a dish made from ingredients I had on hand that could cope with under 5 minutes of prep time. The Sloppy Joes turned into what became known as Lazy Meesas

Lazy Meesas makes 4 wraps

Ingredients
  • 1 can refried beans (I used Amy's own black beans with chilli)
  • 1 can diced tomato
  • 200gram falafel, crumbled 
  • 1 clove of garlic
  • 2 tspn olive oil
  • Braggs (to taste)
  • 2 tomatoes
  • 1 avocado
  • Hummus
  • 4 Bread wraps

Method
  1. Oil a saucepan then combine the refried beans, canned tomatoes, felafel, garlic and braggs. Stir thoroughly and allow to heat.
  2. While the bean and falafel mix is heating, dice the 2 tomatoes and avocado. Combine.
  3. Take the bread wraps and spread some hummus down the the centre of each wrap.
  4. Spoon some bean mix over the hummus, and top with some diced tomato mix before rolling the wrap closed.


It's so basic, it hardly seemed worth a recipe, but it turned out really well, and has been requested twice again since!


A question to all you veg bloggers out there, how do you guys all stay so on top of your blogging so well? Do you write a post in one sitting, or over a few sessions? I think part of my issue is how long I spend writing a post. I'm constantly impressed by the quality of the blogs I read from Planet VegMel, and honestly feel that I'm not keeping mine up to scratch.

Sunday, February 6, 2011

Strawberry And Star Anise Sorbet (raw/vegan)

I'm so far behind with my posts of late, it's rather embarrassing... Till this evening, anytime I sit down to write up a post, my work phone rings. I've still had time to cook, just not anything complex. Thankfully this evening has been a little quieter and I hope I will now be able to start catching up with a few quick, short posts.

Earlier in the week I made a batch of strawberry sorbet. The flavours of star anise and strawberry go together really well and I just love the smell of star anise so jump at any opportunity to use it. I've also found myself making more raw food of late, so rather than make a sorbet with a boiled sugar syrup to infuse the star anise quickly, I left the star anise to sit in lime juice for a few hours to infuse the flavour.

Star anise - it smells awesome and looks cool too


Strawberry and Star Anise sorbet:
This made about half a litre of sorbet.
Ingredients

  • 3 punnets of strawberries (750grams)
  • 2 limes
  • 3 star anise
  • 1/3 cup of agave (double this if you prefer a sweeter sorbet, I prefer mine a little tart)
Method
  1. Zest and juice the limes, setting the zest aside for later.
  2. Crush the star anise a little bit and add to the lime juice. Leave this to sit covered for a few hours to infuse. I left mine for 4 hours. If you do not want to wait, gently heat the juice a little to reduce the infusing time.
  3. Remove the star anise from the lime juice. 
  4. Place strawberries, lime juice, zest and agave into a blender and puree. 
If you have an icecream maker, follow the makers instructions to churn your sorbet.
If like me you don't have one, you can get great textured sorbet by doing the following:
  • Pour the mix into a baking tray and place it in the freezer.
  • When mix is nearly frozen, scrape it back into the blender and blend till smooth. Pour the mix back into the tray and return it to the freezer. 
  • Repeat this process 2-3 times then scape the mix into a storage container and return to the freezer for a couple of hours before eating.
Yum!

Saturday, January 29, 2011

Jasmine Inn, Vegan Friendly Thai Restaurant - Yarraville

After a few bad experiences ending in allergic reactions, I've become rather sceptical of thai restaurants claiming that their dishes are or can be made vegetarian. I've been places where I have explained my allergies and ordered dishes based on the kitchen staffs assurances that a dish is vegan and shellfish free, only to have an allergic reaction a couple of bites in because there is a shellfish paste in the sauce or tiny bits of dried fishy things sprinkled on top as a garnish. Sadly after a couple of bad experiences, I was convinced I couldn't eat at a thai restaurant.

When I was invited to meet friends for dinner at one of the thai restaurants in Yarraville, I was very wary but agreed to go along, resigning myself to ordering rice. My friend had chosen Jasmine Inn which they advised me was the best of the thai places in Yarraville, for the restaurants atmosphere, the service quality and for the food itself.

When the wait staff came to hand out menus, I explained my allergy and asked if they could point out any vegan dishes. I was pleasantly surprised when they handed me a special A4 sheet sized menu, listing all vegan entrees, mains and sides. Turning the menu over, it had a list of all gluten free dishes too. They were both decent sized lists for a non veg, non GF restaurant. That they had enough awareness to create a specific menu for vegan customers had me starting to feel reassured that I could order safely.

We skipped entrees and went straight to mains. Unfortunately I only got 1 photo of food on the night, which was of the Salt and Pepper tofu main I ordered. I know, salt and pepper tofu is probably the safest thing I could have ordered with no sauce to hide fishy bits in, but it was what I felt like at the time and I was not disappointed. This dish was more tofu than I could manage to eat so my friends helped me out by trying some. The flavour was great, up there as one of the best salt and pepper tofu dishes I have had. The batter was perfectly crisp with the silky tofu inside. 

Crispy fried salt and pepper tofu

As none of our meals really came with much in the way of vegetables, we also ordered a plate of stir fried mixed vegetables to share which was very nice, along with roti and coconut rice as sides.

I have to say I am loving the increasing awareness of vegetarian, vegan and gluten free dining I am seeing in Yarraville and Seddon area recently.

Jasmine Inn
03 9689 8899
16 Anderson Street
Yarraville.


Urban Spoon Rocks

Tuesday, January 25, 2011

Raw Strawberry Mousse

I finally replaced my blender, with something significantly more powerful than the previous. While I would have loved to get a vitamix or a blendtech, I really could not justify spending that kind of money on a kitchen appliance, so settled on a 1200 watt sunbeam cafe series blender that I picked up for a ridiculously reduced price and seems to be doing the trick.

It's not as quiet as I like, but at least it doesn't sound like a pack of angry bikers doing laps in my kitchen like the old one did.

To christen it, I finally got around to making an attempt at a raw strawberry mousse. I've been wanting to try this since we visited a strawberry farm a few weeks back. I froze about a kilo of leftover berries ready to use when needed.


Raw Strawberry Mousse
  • 200g soaked raw almonds, drained
  • 500g of strawberries
  • 1 cup of pomegranate juice (see note)
  • 1/2 cup of cocoa butter
  • 1/4 cup agave syrup (or to taste)
  1. Grate or chop the cocoa butter into small pieces. The smaller it is the faster it will melt. Place the cocoa butter in a heat proof bowl. Leave bowl somewhere warm to allow the cocoa butter to slowly melt. I put mine in the sun on the side table. 
  2. Place almonds in the blender or food processor and blend on highest speed till the almonds are as smooth as possible. If they are not blending well, add a little water to help them along.
  3. Separate out as much of the remaining gritty almond meal as possible by pushing the almond mix through a strainer of some sort. I pushed mine through a regular mesh strainer, then through a fine tea strainer. (Don't throw out the almond grit! It makes a great face scrub.)
  4. Place the almond milk in the blender, along with the strawberries, melted cocoa butter, agave and pomegranate juice. Blend at highest speed till combined and smooth.
  5. Taste the mousse and if not sweet enough, add agave till you reach the desired sweetness. The strawberries I had were very sweet and the pomegranate not tart so I did not require any more than 1/4 cup.
  6. Pour into serving bowls and chill in the fridge for several hours to set.
It set like a mousse consistency and I thought it turned out rather well. While Kev liked it also he said it reminded him more of a pot set strawberry yogurt than a mousse. Maybe mousse is a sweeter dish than I remember. The cocoa butter did give a mild chocolaty flavour that I thought was more mousse like, but it was too subtle for Kev. I think this would probably freeze well as an ice cream too.


This is the easiest way I have found to get juice out of a pomegranate with minimal bitterness from the seeds themselves.
  • Peel the outside away in sections, gathering the fleshy seeds together into a zip lock bag as you go.
  • Once you have all the seeds away from the pith, seal them into the bag, pushing as much air out as you can. 
  • Put the bag in the freezer a few hours to freeze.
  • Pull the bag out to thaw when you are ready to use the juice.
  • When defrosted smoosh the seeds around in the bag. The freezing should have burst the seed membrane and with a little massaging you should have a bag of juice, pulp and seeds.
  • Strain the seeds out and press the pulp to get any remaining juice.

Wednesday, January 19, 2011

Raspberry Blackout Cake from Vegan with a Vengance

As the saying goes, all good things must come to an end. Our Swedish family have taken the long flight home to sub zero temperatures (-28C on some days. Eep!!!).

Before we did the sad farewells at the airport, we managed to squeeze in one final dinner at our home with the whole family present. For after dinner I wanted to make a really special chocolate cake. Mum had a wonderful moist chocolate cake recipe she used to always make for birthdays and special occasions. Unfortunately I seem to have misplaced the furry book I wrote down all of mums best recipes in before I moved out of home so had to find another recipe to use.

After scouring through all my cookbooks, I settled on the Raspberry Blackout cake from Vegan with a Vengeance. This recipe just jumped out at me as something I really wanted to try, and Isa's recipes have never let me down yet. I've noticed that this recipe has already been published on a number of blogs (not all of which give her credit as the source) so it seemed to be a rather popular recipe too.

Raspberry Blackout Cake

1 1/2 cups all-purpose flour
1/2 cup Dutch cocoa powder
1 tsp baking powder
1 tsp baking soda
1/2 tsp salt
1 1/2 cups plain rice or soy milk
1/2 cup canola oil (I used almond as I had no canola)
10 oz jar of raspberry jam with 1/2 cup reserved for the batter (I didn't have enough raspberry so I made up the difference with sour cherry in the batter)
2 tsp vanilla extract
1 1/4 cups sugar
Fresh raspberries for decorating and yumminess

  1. Preheat oven to 175C or 350F. Spray two 20cm/8 inch round springform cake pans with cooking spray. If you don't have springform pans, line the bottom of ordinary round pans to prevent sticking.
  2. Sift together the flour, cocoa powder, baking powder, baking soda and salt.
  3. Combine the milk, oil, 1/2 cup of the jam, the vanilla, and the sugar in a large bowl and mix with a hand mixer or strong fork. The jam should be mostly dissolved with the rest of the ingredients; some small clumps are okay.
  4. Add the dry ingredients to the wet in batches and mix until everything is incorporated.
  5. Divide the batter between the prepared pans and bake for 40-45 minutes, or until a toothpick or knife comes out clean.
  6. Remove from oven and let cool in pans.
  7. When the cakes have cooled fully, spread one layer of cake with a think layer of the remaining raspberry jam (give the jam a quick mix to get a spreadable consistency); spread a layer of chocolate icing on top of the preserves.
  8. Place the other layer of cake on top and spread its top with preserves.
  9. Carefully spread the chocolate icing over the top, then ice the sides.
A naked raspberry blackout cake patiently awaiting icing


In the book, the cake is topped with a 'ganache-y frosting' I didn't have choc chips, so made a chocolate butter cream icing.

Chocolate butter cream icing
1 cup of vegan margarine
500 grams of icing sugar (I used billingtons golden icing sugar which has a lovely flavour)
2 tbsp soy milk
2 tbsp dutch cocoa powder

  1. Place all margarine in a mixing bowl and slowly blend in half the icing sugar.
  2. Blend in the milk and cocoa.
  3. Add the remaining icing sugar and mix well.
  4. Chill till ready to use.
Getting there, but it needs something more...

    As just an iced cake I thought it looked a little boring, so I cut some flower shapes out of rolled white fondant and left these to dry for 30 minutes. I then used these along with some fresh raspberries.

    Decorated cake, not over the top at all...


    The cake had a great flavour and the jam made for a really moist, fudgy, rich chocolate cake that everyone loved. This is a cake recipe that I think I will be using often and I think would be perfect as a base for some more fancy cake decorating or shaped cakes as it held it's shape really well and did not crumble or crack.

    So so yummy!


    Yum!

    Thursday, January 13, 2011

    Strawberries, wine and cheese on the mornington peninsula

    Last week when Melbourne's weather turned the corner into summer and we briefly had sun, we figured it was about time we took our Swedish family out of the museums and off to enjoy the outdoors. We took our visitors to spent a day visiting the food and wine paradise around Red Hill. So many wineries and so much fruit and veg for sale direct from the farms!!!! And all 10 minutes drive from my brothers house. I really should visit him more often... For his comany of course, not just the strawberries...

    There were heaps of of options for a visit to the area. Pick up a monington peninsula guide at any winery for listings and a winery trail map. You can also see the map online here, you will need a guide for listings that are not wineries however. The listing changes from year to year but there were 52 wineries listed this year, all colour coded with their open times so you can plan your day.

    There are so many places to talk about, so I will just limit myself to our 4 highlights and a few honorable mentions.

    We started the day at Sunny Ridge Strawberry farm. If you are able, get here early. This place gets very very very busy at times, particularly on weekends and school holidays during strawberry picking times. It is very popular with families with young children - kids under 3 pick for free. And they grow delicious strawberries here. Once you pay your picking fee, you get a punnet and head off to pick your choice of berries from the strawberry fields.

    
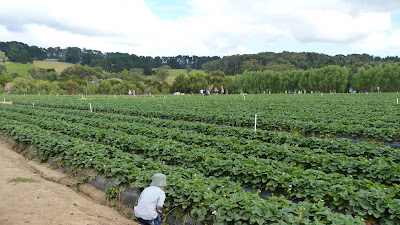
    Sunnyridge strawberry farm picking fields
     After picking our berries, we headed back to the cafe to sample some of their creations. There are a lot of desserts to choose from, and of course nearly everything on offer revolves around strawberries. There can be a bit of a wait on orders from the cafe as the place can get very busy. We ordered at 10am and there was already a 30 minute wait. They make a good cup of coffee here, and offer soy milk for coffees, shakes and their delicious strawberry smoothies.

    We ordered the devonshire tea, with strawberry jam. I don't usually like scones much, but these I could actually manage to eat. The jam was one of the best strawberry jams I have had, very full of fruit and not overpoweringly sweet like some can be. 

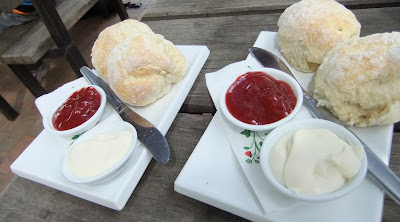
    Sunny Ridge devonshire tea.

    On the specials for the day was also a strawberry mousse, which everyone shared a taste of. It was full of ripe strawberry flavour and very smooth and creamy. Again, not overly sweet either. I am going to have to use some of the strawberries we picked to try making a dairy free strawberry mousse very soon I think. We left there with so many strawberries, most of them we ate over the next few days but I still have a kilo of berries sitting in my freezer now ready to turn into a raw cheese cake or a mousse.
    Sunny Ridge strawberry mousse

    I also ordered some chocolate dipped strawberries for the table. Just look at the size of those strawberries!

    Sunny Ridge chocolate dipped strawberries.

    There was some regret amongst our younger guests that they didn't order the famous strawberry ice cream sundae after we saw some being delivered out to another table. Check the link here to see why - Strawberry temptation. This farm is also closely tied to a wine maker who turns the strawberries into 100% strawberry sparkling wines and liqueurs. Previously I have enquired with them about their fining process and was advised their wines were suitable for vegans. On this visit however I was not able to get an answer to the question as the wine makers were not present, which disturbed me. I have sent through queries to the wine maker again to confirm the wines are still vegan.

    At Sunny Ridge they have a shopfront selling lots of their strawberry and orchard produce such as jams and freeze dried berries, but also sell other local produce such as spices, soaps and hand made fudge.


    Of the wineries we visited, there were 2 standouts - T'Gallant and Montalto.

    We stopped for lunch at T'Gallant. Many wineries in the region will offer a restaurant lunch, and some like T'Gallant will also offer a more casual dining option. At T'Gallant they had affordable, quality pizzas. Of the 4 pizza options on their menu, 3 are vegetarian. We ordered a half magharita and half mushroom gorgonzolla pizza and they were both so so good, even if all the cheese meant I could only have small piece. The third veg pizza option is zucchini mint and rocket, which I have not tried but my brother assures me is just as good. No one was overly hungry for a big lunch with all the tastings that we were doing from place to place, so we just ordered 2 full size pizzas for 12 people. Shown below is 1 full size pizza with half/half topping.


    Wine wise, those that did the tasting recommended the pink moscato and a white wine called claudius. The Claudius I was told, is particularly unusual as it is made from white grapes but by red wine techniques. 

    Later in the afternoon we found ourselves at Montalto vinyard and olive grove. Aside from family shots, all I have from here is a picture of the view:


    and the rose garden hiding in their wetlands walk:


    At Montalto we sampled the olive oil served with ciabatta bread, and a dish of unpitted marinated olives. The highlights for the wine tasters were the late harvest reisling and the rosé. Those of us who were not doing tastings took a walk around the estate, through their sculpture garden and wetlands walk. Around the estate you will find a variety of sculptures that have won Montalto's sculpture prize.

    Montalto, like T'Gallant, has an informal dining menu available as well as a restaurant. A good deal of the produce they use in the restaurant is grown in the estates vegetable gardens and fruit and nut orchards and you can walk through these areas. The restaurant staff advised us that should we wish to return for another visit, they are more than happy to cater for vegetarians if requested on booking.

    Our last stop for the day was Red Hill Cheese. Nestled in bushlands, the seating on the balcony area gives a wonderful setting for a cheese tasting and a perfect finish for the day. I was very pleased to see here that all the cheeses are made with vegetarian rennet.


    The cheesery offers a tasting platter of 8 of their 20 or so cheeses. The cheeses offered on the platter vary from day to day so you will likely not get the exact same tasting experience twice. The platter will always start with a mild cheese and work it's way up to the strongest, and will include a combination of goat, cow and sheeps milk cheeses.

    Following the tasting, pieces of their cheeses can be purchased in their shop front, along with other locally made cheese accessories and accompaniments. Their cheese are also available at a number of places through Melbourne, a listing of these outlets can be found here.

    A few other places in the area that I recommend checking out are Gordon Studio Glassblowers, whos beautiful works can be seen here, Mornington Peninsula Chocolates, where the chilli tequilla chocolate was an experience in itself, and to Red Hill Cool Stores which provides space to local artists crafters and producers to display and sell their work.

    At all places visited I skipped the wine tasting as I was playing designated driver, so did not get a chance to speak to the wine makers to find which, if any, wines are suitable for vegetarians or vegans. I have made inquiries at the wineries visited since and I will update this post with a list when we get replies. I hope I get replies.


    If wineries and farms are not your thing, after we finished at Red Hill, we headed down to Lakes Entrance to introduce Kev's family to my family, and spend a few days enjoying the sun. Below are a couple of pictures taken of the beautiful views, beaches, and the Buchan caves.

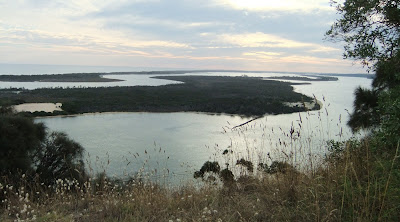
    View of the lakes system from the top of Kalimna hill, Lakes Entrance

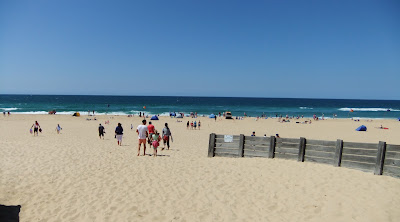
    Lakes Entrance main beach

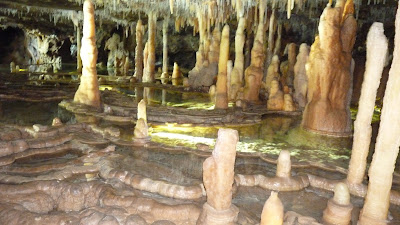
    Buchan caves, Font of the Gods, Royal cave system


    Red Hill is about an hours drive from Melbourne, Lakes Entrance and Buchan are around a 4 hour drive.

    Wednesday, January 5, 2011

    Braised cinnamon tofu

    With all the dining out we have been doing with our family the last few weeks, on top of Christmas, we have been eating a lot of crappy food lately. Don't get me wrong, the food has been tasty and really enjoyable such as the drop in visits to Lord of the Fries, pancake breakfasts, and the night we went out for dessert pizzas (totally awesome concept that I will soon experiment with at home). 

    Delicious ooey gooey dessert pizza wrongness


    But it has all been packed with stuff that leaves me feeling pretty dodgy the next day. Kev has also been indulging in things he as a diabetic usually wouldn't touch with a 10 foot clown pole. So I wanted to make something for dinner that would be healthy. I have been reading quite a bit about the health benefits of cinnamon lately, mainly about it's benefits on blood sugar, but it is also being looked at for potential cancer fighting properties, arthritis relief, memory and cognitive function, and aiding as a food preservative.

    Previously I have really only used cinnamon in making sweet baked goods, desserts or for making cinnamon and apple tea drink. On a whim I googled 'cinnamon tofu' and search results presented me with this gem - Braised Cinnamon Tofu. They have it listed as a recipe to benefit the liver.

    I made a couple of adjustments to the recipe, adding in some vegetables and it worked out rather well. I also prefer more chilli in dishes so increased the amount used. If you don't like your food that spicy, reduce the amount of chilli back to the 1 tsp from the original recipe.
    Braised Cinnamon Tofu

    Ingredients
    • 5 spring onions, trimmed
    • 6 garlic cloves, crushed and thinly sliced
    • 4 small thin slices fresh ginger.
    • 3 tsp hot chilli paste
    • 2 whole cinnamon sticks
    • 1 star anise pod
    • ½ cup reduced salt soy sauce
    • 4 cups water
    • 500 grams of cubed tofu
    • 200 grams of sliced mushrooms
    • 1 bunch of broccolini, chopped
    • 3 baby pak choy, chopped
    Method
    1. Place the ginger pieces, cinnamon sticks and star anise in the centre of a square of muslin or cheese cloth. Bring the corners together and tie up to form a little spice pouch.
    2. In a saucepan, combine the spring onions soy sauce and water. Add in the spice pouch and bring to the boil. 
    3. Add in the cubed tofu and allow to return to boiling. Once the liquid is boiling again, turn the heat down to simmer. 
    4. Leave the pot to simmer for about an hour, then remove the spice pouch. 
    5. Add in the chopped vegetables, and bring back to boiling. Boil till vegetables are cooked to your liking, then serve. 

    Braised cinnamon tofu and vegetables

    I cooked my vegetables a little more than I intended as I got distracted by a phone call, so they were not still a little crisp as I like them. Why does the phone always ring when you are making dinner... 
    The flavour was very nice, with a good mix of ginger and cinnamon soaked into the tofu during the hour of simmering.

    Saturday, January 1, 2011

    Raw vegan cheesecake with berry sauce topping

    I got my fiance a slice of raw cheesecake from TOFWD while we were in the city on boxing day because it was listed as no added sugar. He loved it so much I thought I would have a crack at making one at home.This would also be the first time I have made an attempt at a raw food dessert (unless fruit salad counts...)

    I searched around the web for a few recipes, and by far the best looking one was raw double chocolate cherry cheesecake. The slice in the picture looks delicious. I really want to make this particular recipe one day, but on this occasion I was making one for Kev, who is not really a chocolate fan.

    So I used this as a very loose guide for making a berry cheesecake recipe. All recipes I found called for coconut oil to help the filling set, and all asked for 3 cups of cashews. I used just a little over 3 cups - there were only a small number of nuts left out of the 400 grams after measuring 3 cups, so I just threw them in as well. I used a home made date honey for sweetener, but agave syrup would be fine too. I was surprised at the number of recipes for 'Vegan raw cheesecake' that called for bee honey. On what planet is bee honey considered vegan?

    Raw Berry Cheesecake

    Ingredients

    For the Base
    • 100 grams raw macadamia nuts
    • 100 grams of raw almonds
    • 1 cup of chopped pitted dates
    • 1/2 a cup of coconut
    • A small amount of extra coconut for lining the tin
    For the filling
    • 400 grams of cashew nuts (soaked for at least 4 hours)
    • 3/4 a cup of date honey (see recipe below)
    • 1/2 a cup of lemon juice (approximately 2 small lemons)
    • Rind of 2 lemons
    • 3/4 cup of coconut oil
    • Seeds from 1 vanilla bean
    • 1/3 a cup of fresh apple juice
    For the topping
    • 200 grams of berries. I used blueberries and strawberries.
    • 1 tsp of lemon juice
    • Either 1/4 a cup of date honey or a handful of dates
    Method

    Base
    1. In a blender or food processor, chop the nuts. A good blender helps here, since my blender was pretty crap, I used a magic bullet to grind the nuts instead.
    2. Add the chopped dates and the 1/2 cup of coconut to the blender, and blend till it all comes together into a paste.
    3. Sprinkle a little coconut into the bottom of your cheesecake pan to help stop the base sticking, then press the base mix into the pan. Smooth flat with the back of a spoon.
    4. Put in the fridge to set till your filling is ready.
    Filling
    1. Drain the soaked cashews.
    2. In the blender or food processer, puree all the ingredients for the filling till all are combined into a smooth paste. The mix will give a consistancy a little like ricotta cheese.
    3. Pour the filling mix into the cheescake pan over your prepared base.
    4. Tap the pan gently on the bench to force out any air bubbles and help smooth the top of the filling out.
    5. Top the filling with either plastic wrap or baking paper and put the pan into the freezer to set.
    6. Cut serving slices from the frozen cake and let the slices thaw for an hour or so before serving.
    Topping
    1. Puree the blueberries, lemon juice and date honey till smooth.
    2. Spoon a little over each cheesecake slice just before serving. 

    The cake is rich in nuts so I served it in smaller slices. 5 servers used just under a quarter of the cake. The beauty of it is though, it should keep really well in the freezer for several months so you can keep a tasty healthy dessert on easy hand. The sauce can also be kept in the freezer.

    I don't believe this dessert could be classed as sugar free as I have seen some other raw cheesecake recipes claim - there are still sweeteners used that will have an affect on blood sugar. There is however less sugar than used in a traditional cheesecake, and the sugars are from a lower GI source. So a piece of cake from this recipe would be a better option for a diabetic friendly dessert than a cheesy sugar filled piece of regular cheesecake.


    The cheesecake pan I used to make this was smaller than I would have liked, so I ended up with a little filling left over. I stirred some mashed blueberries through this and pushed it into a small heart shaped cake pan I had, so ended up with a small cheese cake with no base. I served this as a kind of pate with a plate of sliced fruit for afternoon tea one day. It was basically like a sweet cheese and went really well with the cut fruit even with dry water crackers.


    How I make date honey/date syrup:


    Ingredients
    • 1 cup of pitted dates, preferably medjool
    • 2 cups of water
    • 1 tbsp of lemon juice
    Method
    1. Chop the dates into small pieces.
    2. Place all ingredients into a blender and process. Start out at slow speed and gradually work up to full power to puree the dates as finely as possible.
    3. Pour the mix into a storage bottle. The mix should happily keep for 2-3 weeks.
    4. If your blender has not been able to get the dates as fine as you would like (as my blender was not), then push the syrup through a sieve to get the larger bits out before use. 

    I'd like to get one that matches my new mixer. A beautiful red Kitchen Aid mixer that my mother gave me for Christmas. Best. Present. Ever!!!!


    Kitchen Aid will probably prove too expensive though.

    What ever blender I buy needs to be a quiet one - I discovered our beagle is terrified of the noise the one I have made, and it took us an hour to coax her out of her hiding place when I first started blending for this recipe. Kev had to take her to the park while I finished the rest.

    Can anyone recommend a good quality, affordable, quiet blender?

    Happy new year everyone!